How to Add WordPress Snippets
You’ve found the perfect snippet to customize your WordPress site, but how do you add it? Most places that you find code snippets will tell you to place it in your child themes functions.php file, or even your own custom plugin. But how do you do that? Well, the good news is, it’s not at all difficult, but the bad news is that if you do it wrong you can end up breaking your site!
Not to worry though, we’ll explain how to do it correctly in the post below. But first, we’ll show you an even easier way of adding code snippets to your site, one that doesn’t involve editing any files or creating your own site specific plugin…
Method 1 – Using a Code Snippets Plugin
Easy peasy lemon squeezy! This method involves installing a free plugin on your WordPress site and using that to a add your code snippets. No files to edit at all, and no risk of breaking your site. The Code Snippets plugin can be found on the WordPress Plugin Repository and it doesn’t cost a penny.
After you have installed and activated the Code Snippets plugin, you will see a new item on your admin menu called Snippets. Clicking this will take you to the Code Snippets admin screen, where you can add, remove and manage your snippets. You’ll notice that the plugin includes some sample snippets to give you an idea of how to add different types code. These will all be deactive by default, so they won’t be modifying your site (unless you activate them). Feel free to take a quick look at them, or delete them, you don’t actually need them.
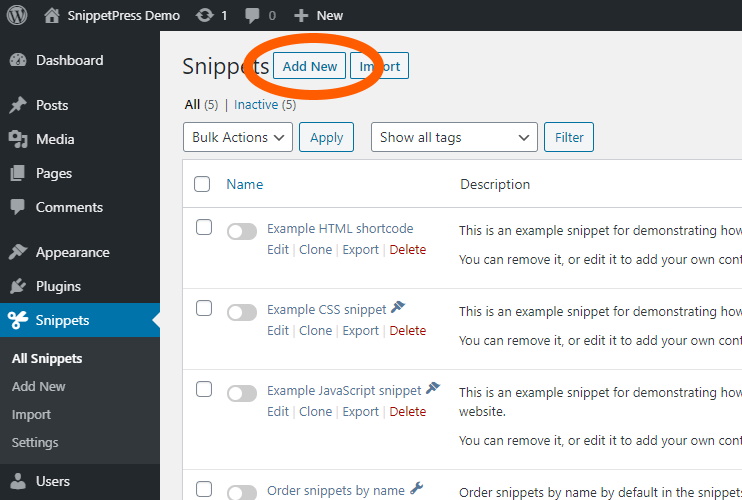
To add a new code snippet, click on the Add New button at the top of the screen:
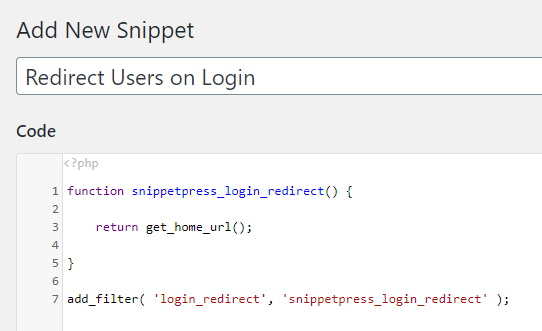
This will take you to the Add New Snippet page. First things first, you’ll need to add a title for your snippet. This can be whatever you want, but it’s best to name it something that describes what the code does. In the example below, we’re going to add a snippet to redirect users to our home page when they login to our site, so we’re going to call the snippet “Redirect Users on Login” – nice and simple!
Once you’ve added a title for your snippet, you can go ahead and copy your snippet into the code box:
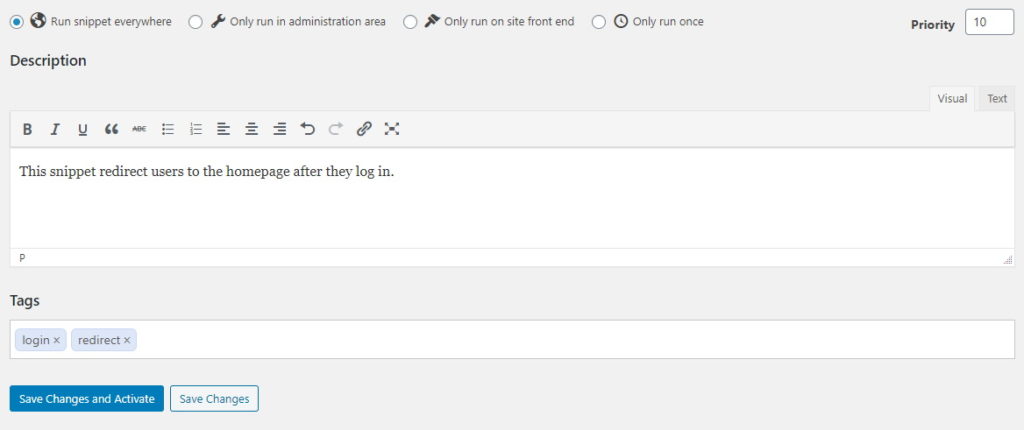
Now that you’ve entered your code into the code box, there are just a few more optional settings to look at. You’ll notice that underneath the code box are some settings to allow you to choose where to run the snippet. You can choose to run it on your whole site, only in the admin area, only on the frontend, or only run once. If you’re not sure which to choose, then keep the default “Run snippet everywhere” option selected.
You can also choose the priority in which to run snippets. Lower numbered priorities are ran first, whilst higher numbered priorities are ran later. If you’re not sure, just leave this as the default 10.
Finally, you can add a description and tags to the snippet. The description allows you to explain in more detail what the snippet is for and how it works, plus anything else you want to make a note of for your future self (or others who are working on your site) to know. The tags allow you to easily sort and filter snippets by their functionalilty. In our case we’ve added the tags “login” and “redirect”. If we add any more snippets connected with logging in, then we can add the “login” tag to these too, which will allow us to filter all of our snippets to find the ones to do with logging in.
Once you’ve finished, you can click Save Changes and Activate to save the snippet and instantly activate it, or Save Changes if you want to save it but not implement it on your site yet.
The great thing about using the Code Snippets plugin is that if you make a mistake with the code, the plugin will warn you, preventing you from breaking your site. If for whatever reason a pesky piece of incorrect code does get through, and you think you’ve broken your site, you can easily fix this by enabling safe mode and deactivating the guilty snippet. To do this, you can simply go to:
https://example.com/wp-admin/admin.php?page=snippets&snippets-safe-mode=1
or add the following to your wp-config.php file:
define( 'CODE_SNIPPETS_SAFE_MODE', true );
To be honest, we’d recommend trying the first option initially, and only editing the wp-config.php file if that doesn’t work. Overall though, the Code Snippets plugin will detect 99.9% of buggy code, so you should never need to do this. Either way, it’s a far less risky method of adding code snippets if you’re not familiar with code and the WordPress file structure!
Method 2 – Adding to functions.php
When you’re browsing the web for WordPress snippets, you’ll find that most sites tell you to place the snippet in a file called functions.php in your child theme. That’s all fine and good, but what is a functions.php file, and where did this child theme come from? If you already know, then feel free to skip the next few paragraphs. If not, let’s take a quick look…
Every WordPress theme has a file called functions.php. This file contains code that can add and change features on your site. Think of it like a plugin that’s always activated. Any code in the functions.php file is automatically ran by your site. That’s why it’s a great file to add snippets to.
The problem is, every time you update your WordPress theme, the functions.php file will get overwritten by the update, and you’ll lose all of the hard work that you’ve done customizing your site. Of course, you could add all of your snippets back in every time you update the theme, but that would be a time consuming task, and if you made any mistakes you could break your site.
That’s where child themes come in. In the words of WordPress “A child theme is a theme that inherits the functionality and styling of another theme, called the parent theme. Child themes are the recommended way of modifying an existing theme.” So, a child theme builds on top of a parent theme, and when the parent theme is updated, all of the customizations you made in the child theme remain safe.
Any theme you download from the WordPress repository, or buy from somewhere like WooCommerce or CodeCanyon, is a parent theme. You can then easily make a child theme for the parent theme and customize to your hearts content. Every child theme will have its own functions.php file.
Okay, so now we know what a child theme is and we’ve got one installed on our site, we need to look at how to add snippets to the functions.php file. There’s two ways to do this. One allows us to edit the file directly in WordPress itself, and the other requires us to download, edit and re-upload the file using FTP.
Editing functions.php directly in WordPress
To edit the file directly in WordPress you need to be logged in to the backend as an Administrator. Once you’re logged in, follow these steps:
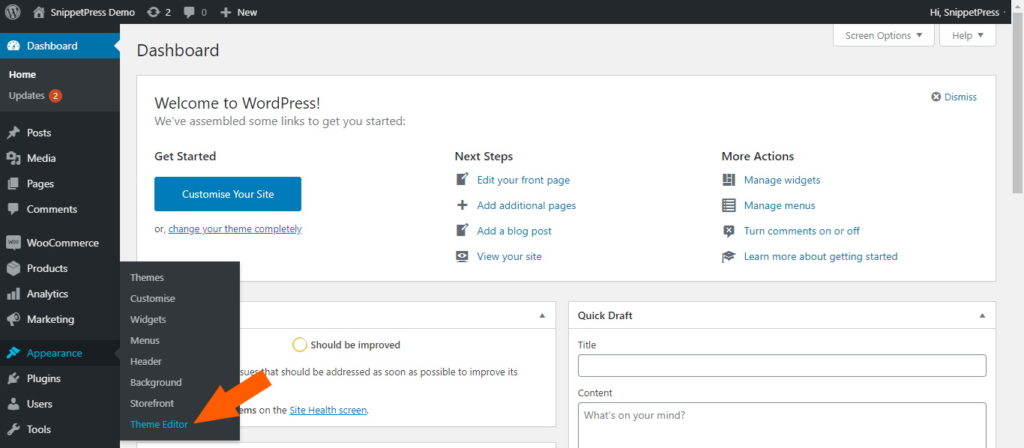
1. On the lefthand sidebar, hover over Appearance and click on Theme Editor:
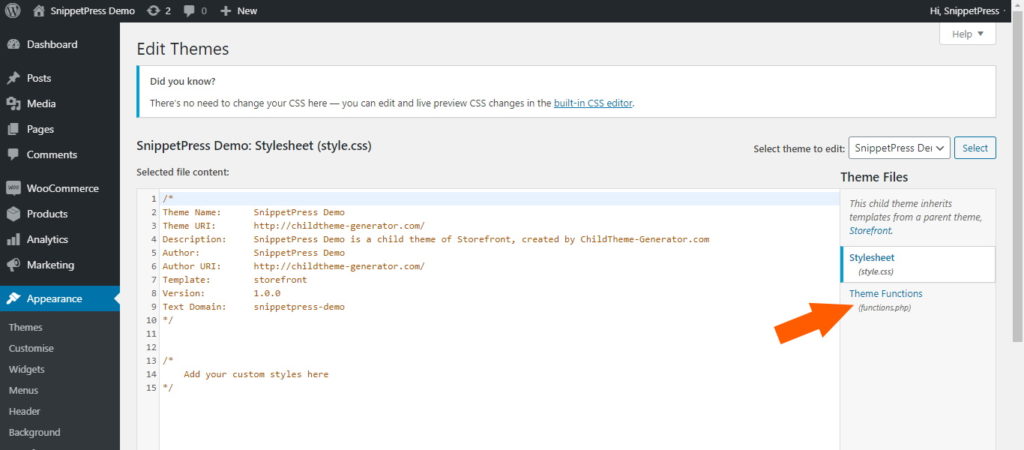
2. This will open up the Theme Editor screen. In the righthand sidebar, click on functions.php (it may say Theme Functions instead):
3. You’ll now be shown your themes functions.php file. Scroll right to the bottom of the file and place your code snippets there:
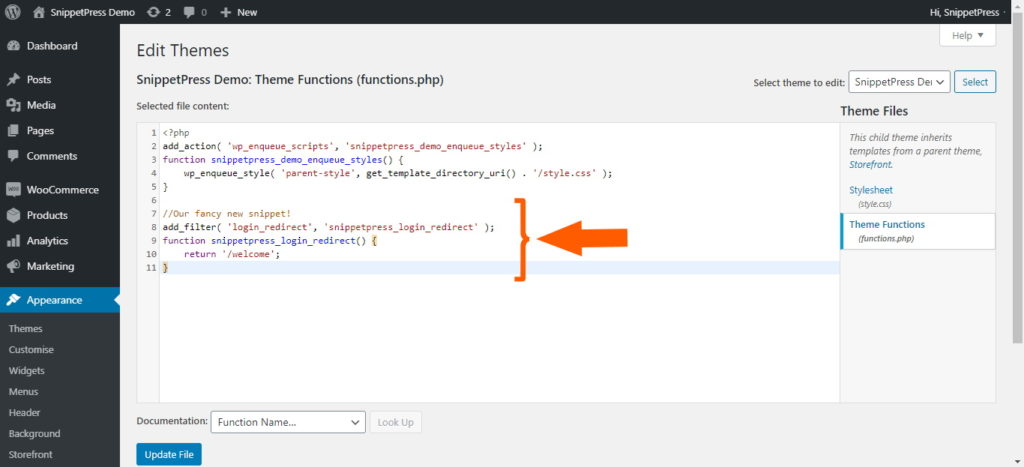
4. Once you’ve added your code snippet, go ahead and click the Update File button.
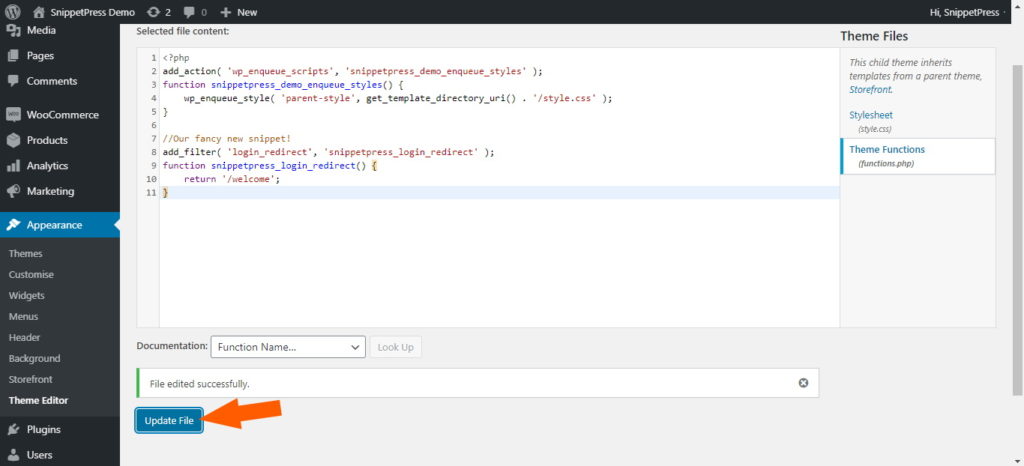
WordPress will now check the code you’ve added is all okay. If it is, the file will save and the customizations will be active on your site – you can go ahead and close the window, your work is all done now. If, however, the code isn’t okay, the file will not be updated and WordPress will let you know of any errors so that you can fix them before clicking on Update File again.
Editing functions.php using FTP
The other way to update the functions.php file is using an FTP client. There’s lots of FTP clients out there, but we’re going to show you how to use the most popular one – FileZilla.
1. If you don’t already have FileZilla, dowload and install it from filezilla-project.org
2. Open FileZilla and enter your sites FTP credentials in the top to log in. You can get these credentials from your web hosting provider. You’ll need:
- Your sites host (it’s IP address)
- Your FTP username
- Your FTP password
- The FTP port
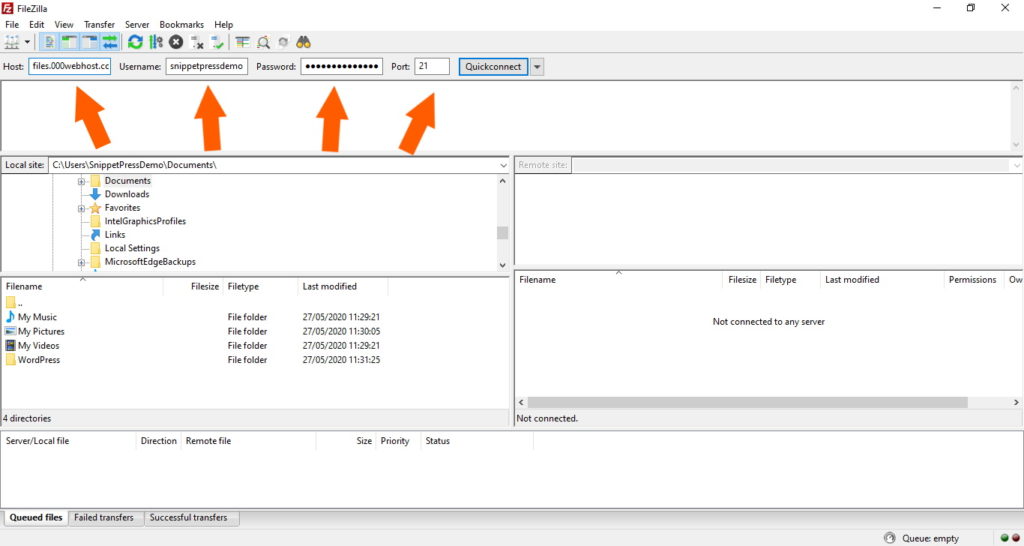
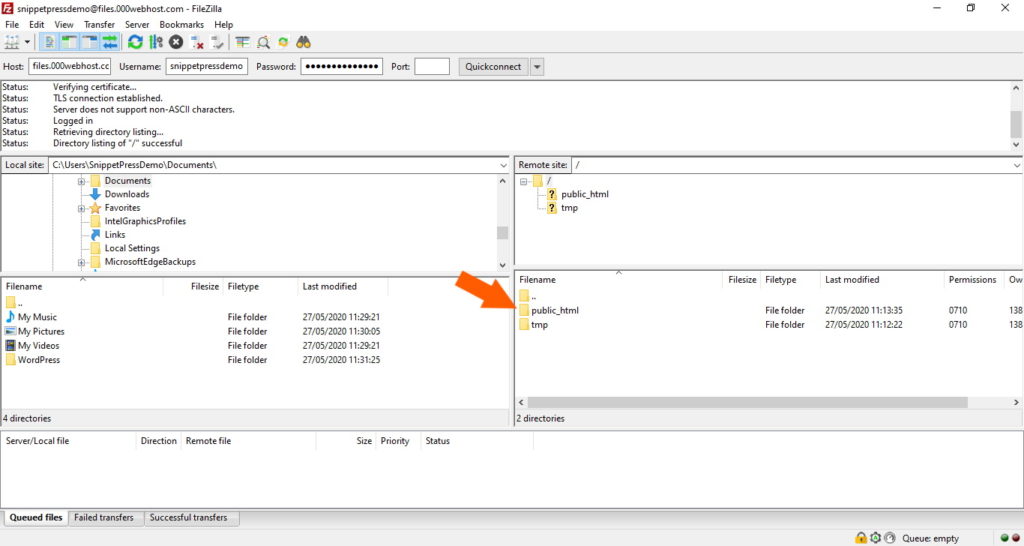
3. Once you’re logged in, you’ll see your website files in the right hand box called Remote site. The exact structure will depend on your web host. You now need to navigate to your WordPress install. In our case, this is in the public_html folder.
Double clicking on this will open up our WordPress install. If you don’t have a public_html folder, check with your web host exactly where you can find your WordPress install.
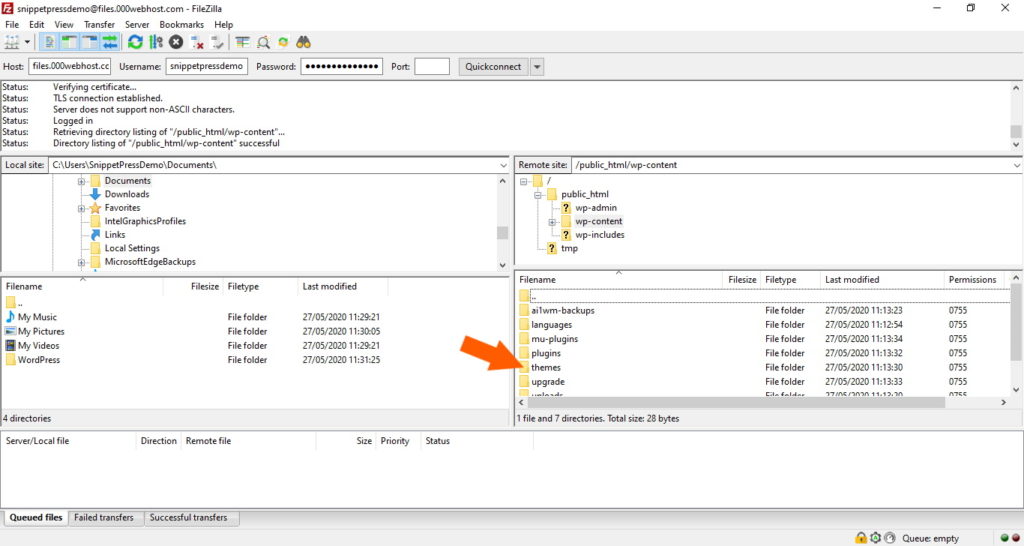
4. Double click on the wp-content folder, then double click on the themes folder. This will show you all of the themes currently installed on your site:
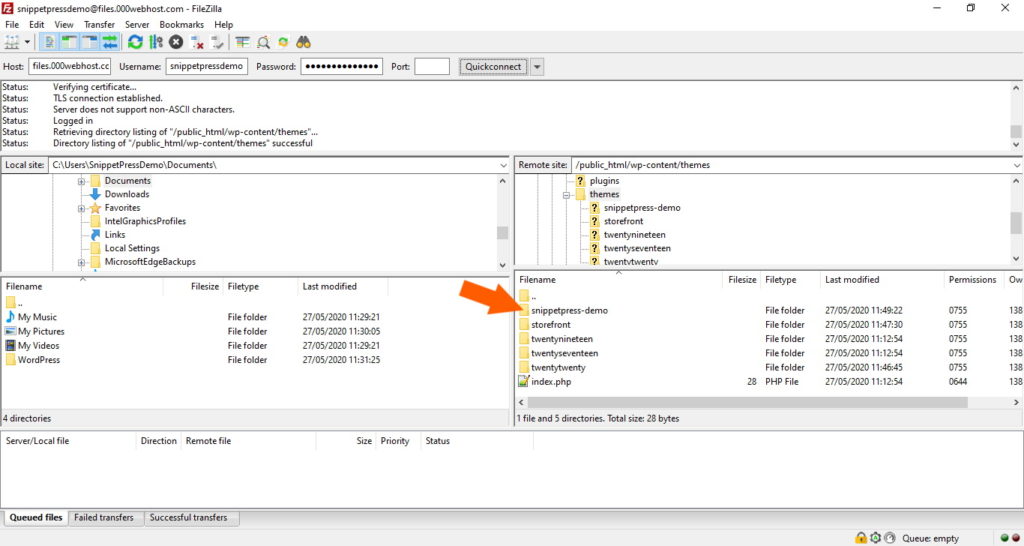
5. Double click on your child theme. In the screenshot below, our child theme is called snippetpress-demo. Yours will be called something else, but you should be able to recognize it:
6. You’re going to be downloading the functions.php file to your computer in order to edit it, so in the left hand box called Local site, navigate to a folder on your computer where you want to download the file to. We like to create a dedicated folder in our documents called “WordPress” so that we can easily find the file, but that’s entirely up to you:
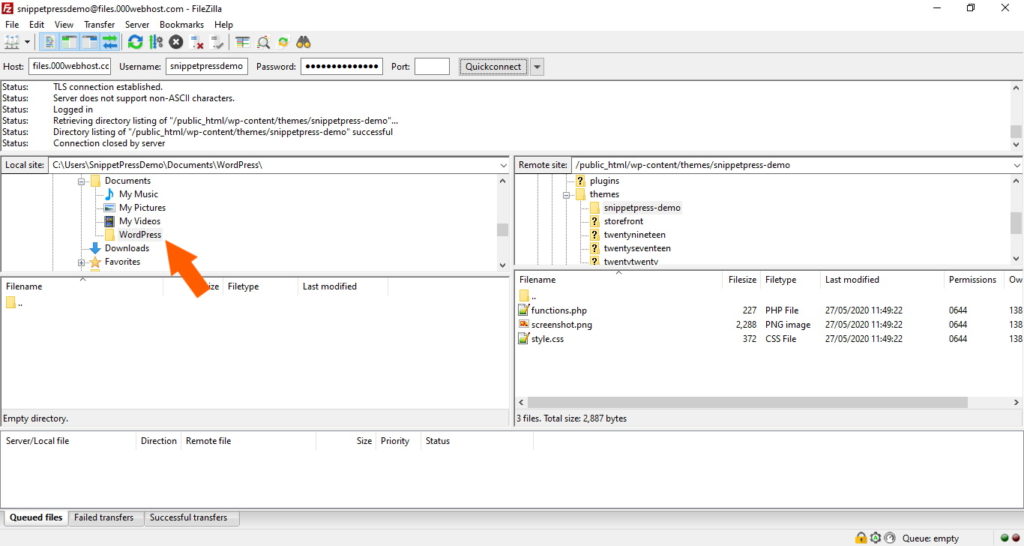
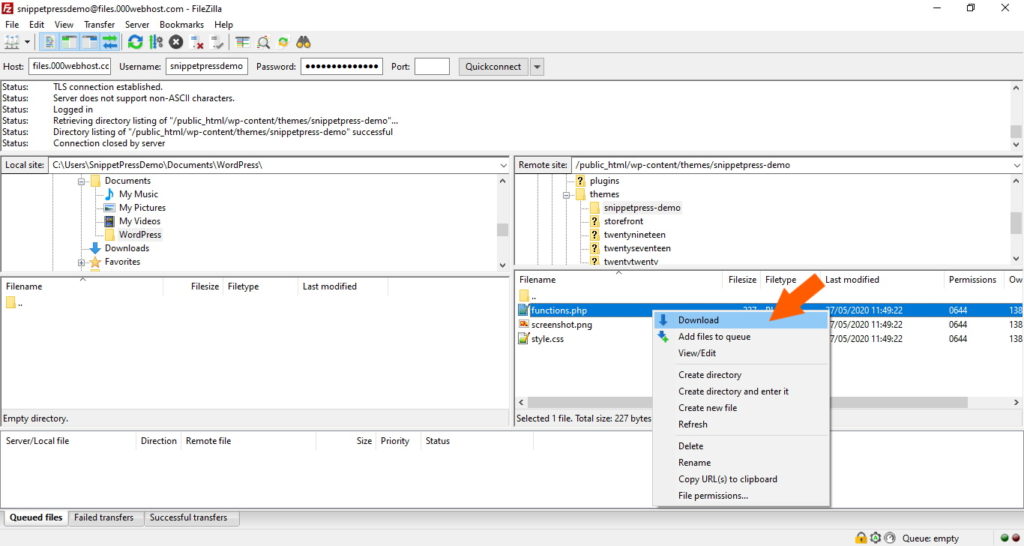
7. Now download the functions.php file by right clicking on it in the right hand Remote site box, and clicking Download. This will download it to the folder on your computer that’s shown in the left hand Local site box:
8. The functions.php file is now on your computer, but before we edit it, go ahead and make a copy of it, just in case anything goes wrong.
9. Now you’ve made a copy, you can go ahead and open the file in whatever text editor you like. We use Notepad++, which can be downloaded for free from notepad-plus-plus.org, but you can use the default Windows or Mac text editor if you like.
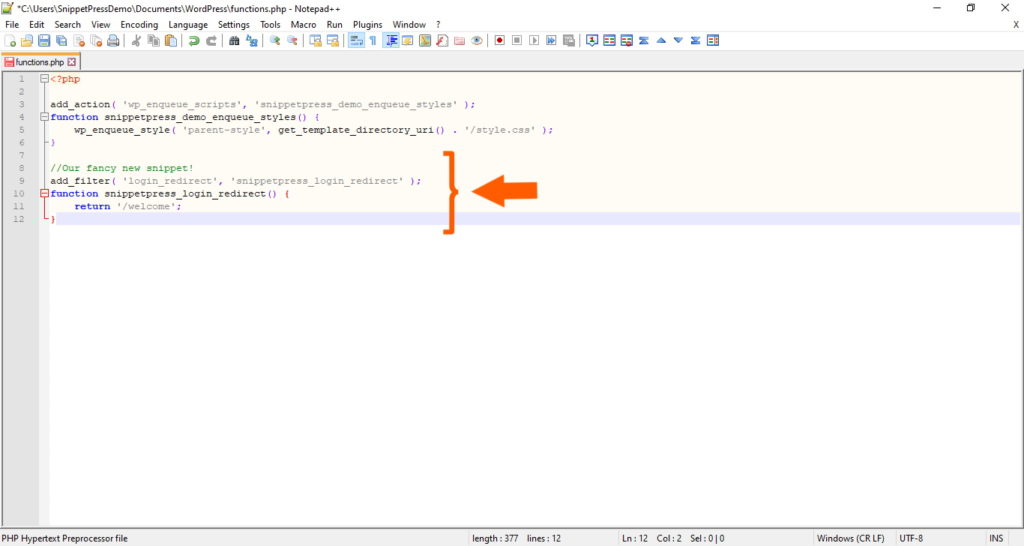
10. Once you’ve opened the functions.php file, scroll right to the bottom, paste in your code snippet and save:
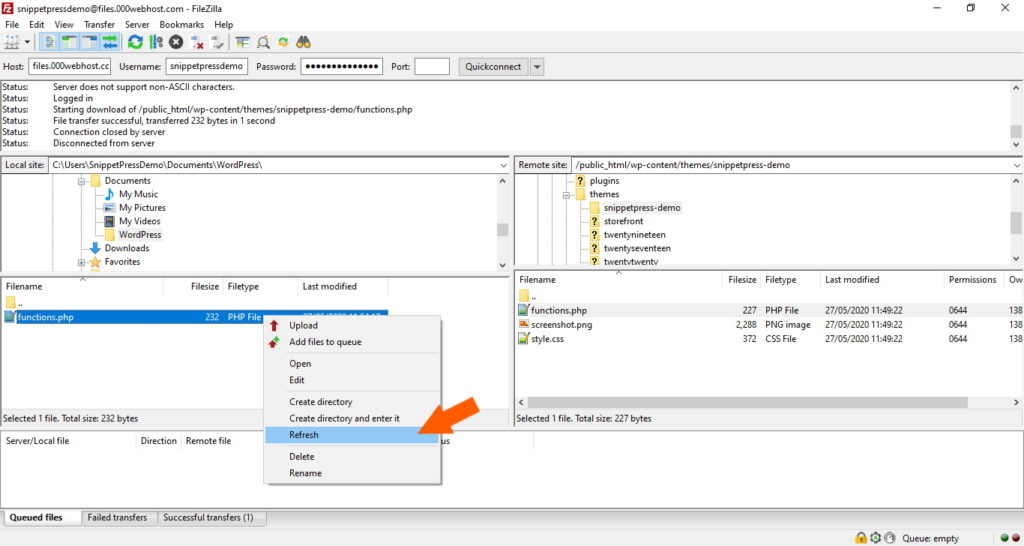
11. Go back on to FileZilla, making sure that you’re in the same folders for the left hand Local site and right hand Remote site boxes as you were before. Now right click the functions.php file in the left hand Local site box and click Refresh:
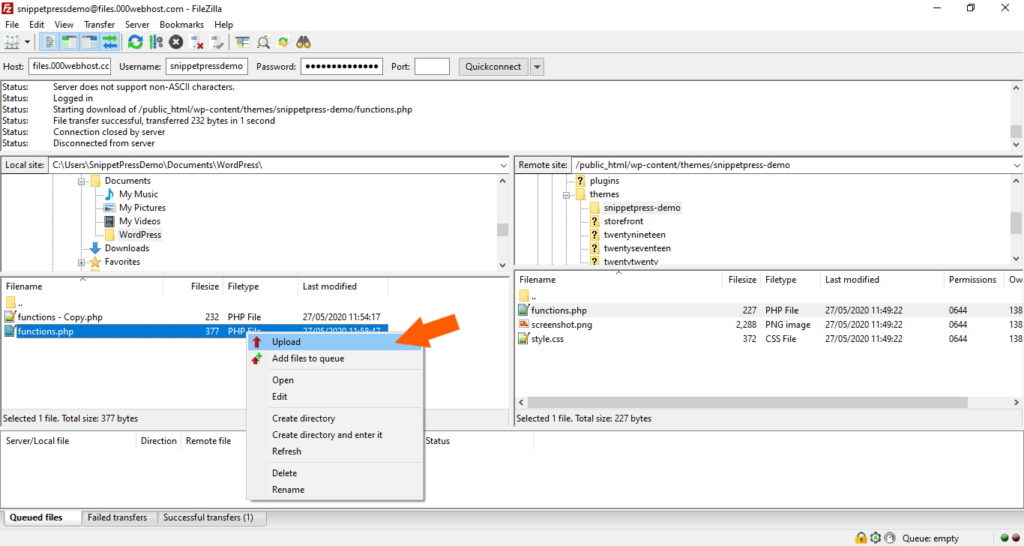
12. Now that FileZilla has refreshed the file, right click on it again and click Upload:
13. You’ll be shown a popup saying that the file already exists in the destination directory. Don’t worry, just make sure that Overwrite is checked and click OK:
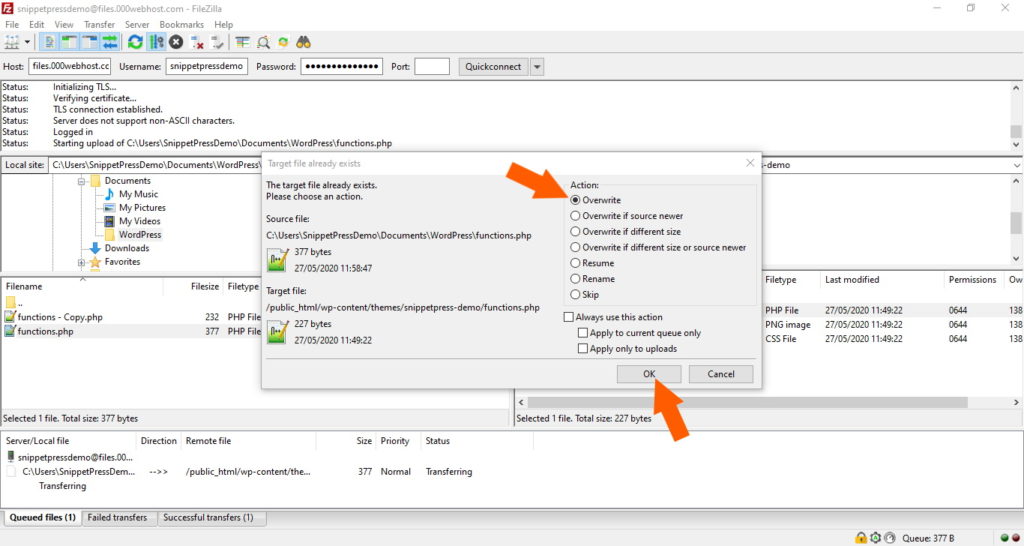
14. That’s all there is to it, your functions.php file has been downloaded, edited and re-uploaded. If your code snippet doesn’t contain any errors then the customizations will now be active on your WordPress site. Head over to your site to check that everything is working.
If you’re presented with error messages or a blank white screen, then something isn’t quite right with your code. You’ll need to go back, fix the code, re-upload it and check your site again. Hopefully though your site is all good and working as it should. If that’s the case then you’re all done and it’s time for a well deserved coffee!
Method 3 – Create a Site Specific Plugin
Using a child theme to add code snippets is all well and good, but what if the child theme you’ve bought is already a child theme? For instance, you might be using the Galleria Theme, a child theme of the popular WooCommerce Storefront theme. If you went ahead and added your code snippets to the functions.php file of Galleria, you’d lose them when you update the theme, just like if you were using a parent theme. Bummer! Unfortunately, it’s not really possible to create a “grandchild” theme either. Double Bummer!
Don’t get disheartened too quickly though. There’s one more way that we can add code snippets to WordPress without using a plugin. Well, without using a plugin that somebody else has coded anyway. We’re going to create a site specific plugin, a plugin that contains nothing other than the customizations that you have made on your site. It’s a plugin, but with no more code than what you’d add to your child theme.
A quick side note, if you’re adding lots of code snippets and customizations to WordPress, you’re probably best off creating a site specific plugin anyway, as you’ll be able to split your code up into multiple files, making it much easier to maintain your code in the future. We’ll show you how to do that in a little bit, but first, back to creating the site specific plugin in the first place.
So, how do you make a site specific plugin? It’s actually really easy. All you need is a few lines of code, then you can start adding your code snippets. Lets take a look:
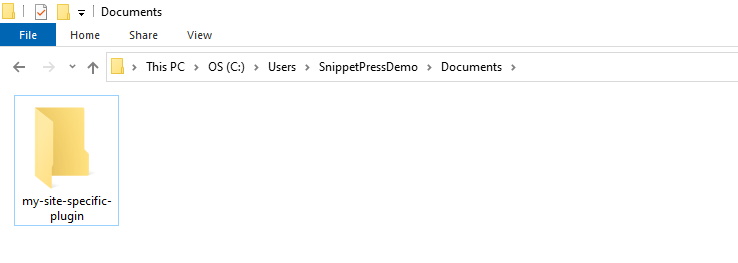
1. First things first, you’re going to need to create a folder on your computer. Call it something like my-site-specific-plugin:
2. Open up your text editor. We use Notepad++, which can be downloaded for free from notepad-plus-plus.org, but you can use the default Windows or Mac text editor, or any other if you like.
3. Now you’ve opened up your text editor, you’re going to need to paste some code in. This code is the bare minimum that a WordPress plugin needs. It tells WordPress what your plugin is called and what it does. So go ahead and paste the following code in. Feel free to change the title and description to whatever you like:
<?php
/**
 * Plugin Name: My Site Specific Plugin
 * Description: Adds customized code snippets to my WordPress site
 */

defined( 'ABSPATH' ) || exit;

/* Start Adding Snippets Below this Line */
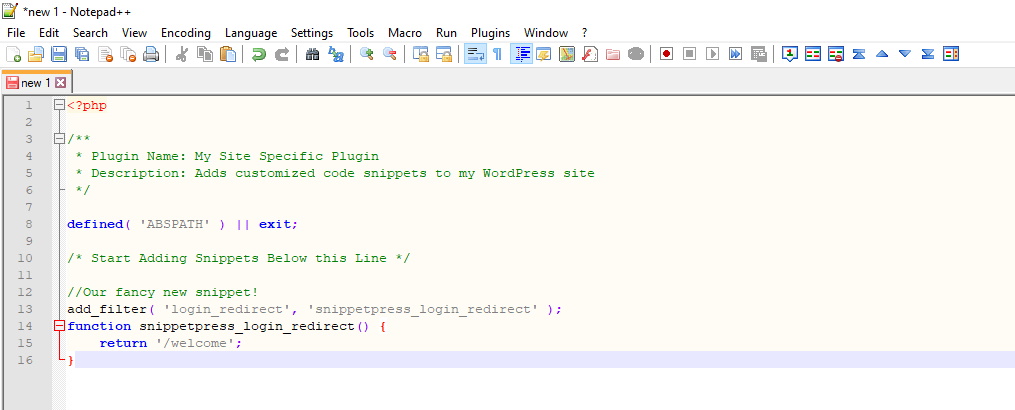
4. You’re almost done with the coding… all you need to do is add your code snippets to the file. Just add them underneath the line that says /* Start Adding Snippets Below this Line */. You should have something that looks like this (but with your snippets, not my example one!):
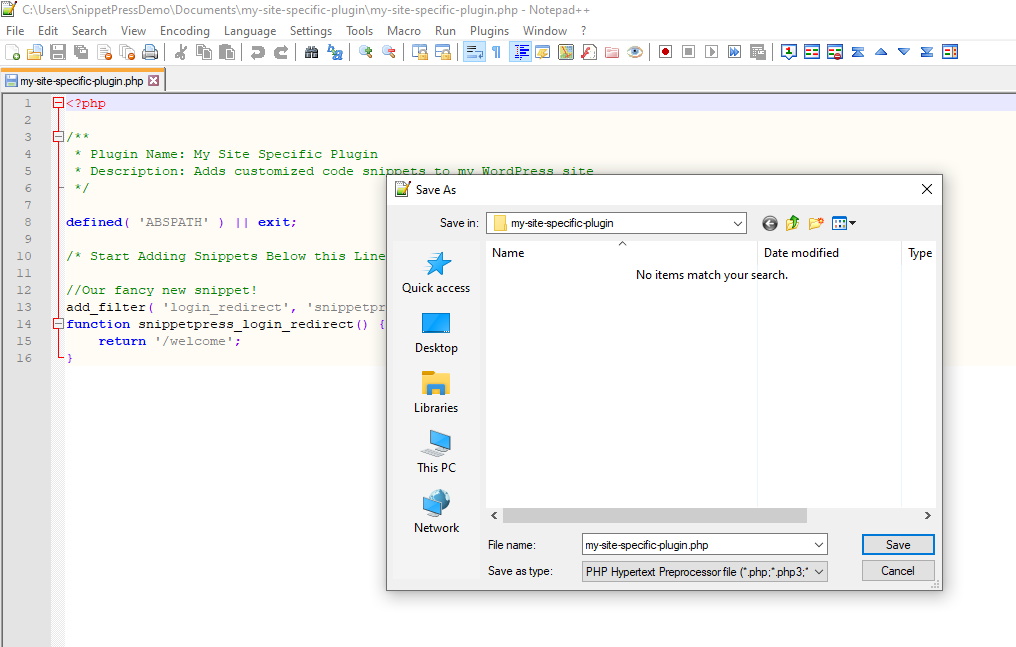
5. Now you’ve added all of your snippets, you need to save the file. It needs to be saved in the folder you created in step 1, and needs to have the same name as your folder, but with .php after it. So if you called your folder my-site-specific-plugin, your file needs to be saved as my-site-specific-plugin.php:
6. All that is left now is to install the plugin. To do this, you need to create a zip file of your plugin. On Windows, this is done by right clicking your plugin folder, hovering over Send to and clicking on Compressed (zip) folder:

7. Once you’ve got a zipped file of your plugin, just head over to your WordPress backend and install the plugin like you would any other. Just go to Plugins->Add New, click on Upload Plugin, browse for your zip file and hit Install Now:
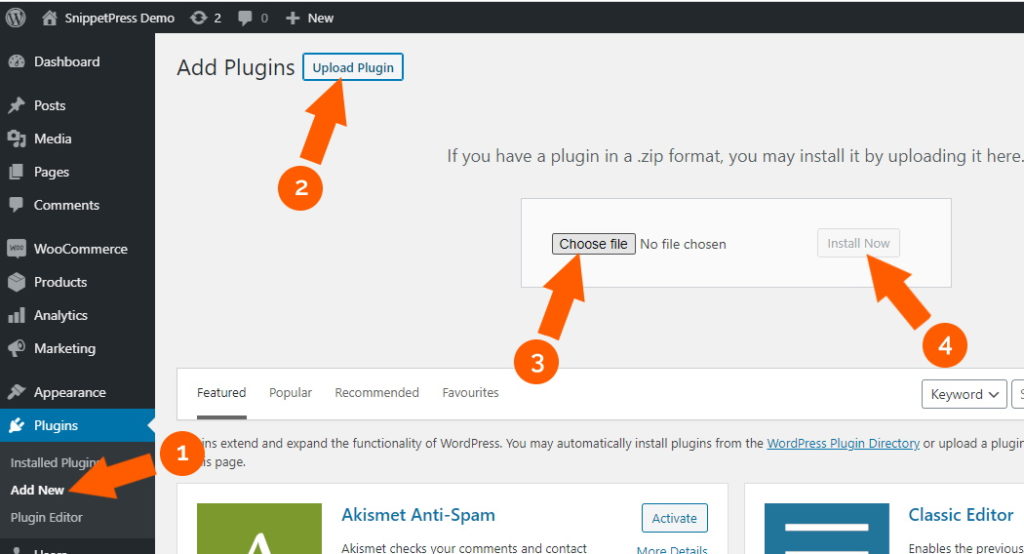
8. Activate the plugin. WordPress will check your plugin for any errors, and if it finds any, will give you an error. If that happens, you’ll need to delete the plugin from your WordPress install, go back and check your code, then reupload and activate. Hopefully everything is okay though and your site is working properly. If that’s the case, well done, you’ve just successfully made a site specific plugin!
Modifying a site specific plugin
If you’re creating and maintaining a WordPress site, then making a site specific plugin to add all of your customizations is probably just the beginning. You’re going to want to be able to add, remove and modify snippets at some point in the future. The great news is, it’s just as simple as it is with a child theme. You can use the same steps that are explained in Method 2 to edit your site specific plugin. The only difference is that instead of going to Appearance -> Theme Editor, you go to Plugins -> Plugin Editor. Choose your plugin from the dropdown in the top right of the screen, then click on the appropriate file on the right sidebar. It’s advised that you deactivate the plugin before changing it, then reactivating it once you’re done.
You can update through FTP as well. Again, it’s just like with a child theme, except that once you’re in the wp-content directory, you go to plugins, then your site specific plugin. You should also deactivate the plugin before changing it, then reactivate once you’re done.
BONUS – Splitting a site specific plugin into multiple files
I mentioned earlier that if you’ve got a lot of code snippets, it’s possible to split them up into multiple files in your site specific plugin. This is really useful if you have a lot of snippets, as it helps you to organize them so that you can find them more easily if you need to modify them in the future. As promised, I’ll quickly show you how to do this:
1. First of all, open up your text editor and create a new file. Add the following to the top of the file:
<?php
/**
 * Snippet to do something on my site
 */

defined( 'ABSPATH' ) || exit;

/* Start Adding Snippets Below this Line */
2. Add your snippet(s) below this. It’s best to group related snippets in one file.
3. Save the file in your plugin folder. You can call this file whatever you like, but a name related to the customizations makes the most sense. Make sure that the name doesn’t contain any spaces and that it has .php at the end. In this example, I’m going to name my file snippet-file-one.php
4. In your main plugin file (the one you made earlier), add the following just below the defined( 'ABSPATH' ) || exit; line:
require_once( plugin_dir_path ( __FILE__ ) . '/snippet-file-one.php' );
Replacing snippet-file-one.php with the name of your file. So you’ll have something like this:
<?php
/**
 * Plugin Name: My Site Specific Plugin
 * Description: Adds customized code snippets to my WordPress site
 */

defined( 'ABSPATH' ) || exit;

require_once( plugin_dir_path ( __FILE__ ) . '/snippet-file-one.php' );

/* Start Adding Snippets Below this Line */
You can split your plugin up into as many files as you like. Just make sure that you have a require_once line for each file, replacing the file name each time:
...
require_once( plugin_dir_path ( __FILE__ ) . '/snippet-file-one.php' );
require_once( plugin_dir_path ( __FILE__ ) . '/snippet-file-two.php' );
require_once( plugin_dir_path ( __FILE__ ) . '/snippet-file-three.php' );
...
You can even split the plugin up into folders. To do this, you just need to put the folder name in the require_once line too, something like:
...
require_once( plugin_dir_path ( __FILE__ ) . '/snippet-file-one.php' );
require_once( plugin_dir_path ( __FILE__ ) . '/snippet-file-two.php' );
require_once( plugin_dir_path ( __FILE__ ) . '/snippet-folder/another-snippet-file.php' );
...
5. Every time you add a new file or folder to your plugin, you’ll need to reupload it to your site. Just zip it up, and upload it as if you were uploading a brand new plugin. WordPress will automatically replace the old version with the new version, without you needing to deactivate it.
Conclusion
There we go, it was a long one today, but we’ve covered in detail the three ways to add snippets and customize your WordPress site. If you made it this far, congratulations, you’re well on the way to making your site the way you want it. I think you definitely deserve a coffee (or three)! I hope this tutorial has been helpful, if it has, let me know in the comments below, and whilst you’re there, let me know your favourite method to add custom code to your site.
